Tracheotomy is an emergency surgical procedure involving the incision of the anterior wall of the cervical trachea, followed by the insertion of a tracheal cannula to establish an artificial airway.
Anatomy
The cervical trachea is situated in the midline of the neck, extending from the lower edge of the cricoid cartilage to the suprasternal notch, consisting of roughly 7 to 8 tracheal rings. It is covered anteriorly by the skin and fascia. The medial edges of the sternohyoid and sternothyroid muscles converge along the midline, forming a white fascial line, where muscle division can be performed with minimal bleeding, facilitating exposure of the trachea.
The isthmus of the thyroid gland is typically located over the 2nd to 4th tracheal rings. The incision should ideally be placed below the lower edge of the isthmus to minimize the risk of thyroid injury and associated bleeding. Around the 7th to 8th tracheal rings, the pleural apex and the brachiocephalic artery and vein traverse nearby, so excessively inferior incisions should be avoided.
The posterior tracheal wall lacks cartilage and is adjacent to the anterior wall of the esophagus. Care should be taken during the incision to avoid cutting too deeply, which could damage the posterior wall of the trachea and the esophagus, potentially resulting in a tracheoesophageal fistula.
The common carotid artery and internal jugular vein are located bilaterally in the deep plane of the sternocleidomastoid muscles, and at the level of the cricoid cartilage, these vessels lie relatively far from the midline. However, as they descend, they gradually approach the midline and come into closer proximity to the trachea at the level of the suprasternal notch. The triangular region formed by the apex at the suprasternal notch and the anterior borders of the bilateral sternocleidomastoid muscles is referred to as the "safe triangle." Tracheotomy procedures are performed in this midline region to avoid accidental injury to major cervical vessels.
Indications
Laryngeal Obstruction
Severe laryngeal obstruction caused by any condition (grade III or IV obstruction), especially when the underlying cause cannot be immediately resolved.
Accumulation of Lower Airway Secretions
Conditions such as coma, cranial or brain lesions, multiple neuritis, respiratory tract burns, or chest trauma.
Preliminary Procedure for Certain Surgeries
Procedural preparation for surgeries involving the maxillofacial region, oral cavity, pharynx, or larynx, to facilitate surgical manipulation, prevent blood from flowing into the lower respiratory tract, or prevent postoperative local swelling from impairing breathing.
Prolonged Mechanical Ventilation
When long-term mechanical ventilatory support is required.
Preoperative Preparation
Surgical Instruments
Surgical instruments must be prepared, including scalpel, scissors, retractors (e.g., incision retractors and thyroid retractors), hemostatic forceps, sutures, needles, needle holders, surgical forceps, dressings, suction devices, and syringes.
Tracheal Cannula
Appropriate tracheal cannulas of different types and sizes should be selected based on the patient’s gender and age, and their integrity should be verified.

Figure 1 Tracheal cannula
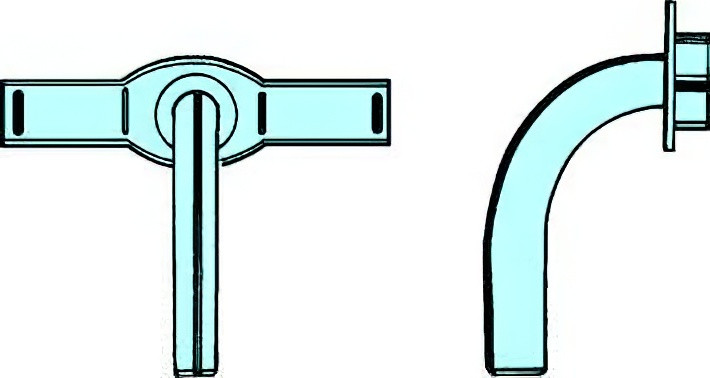
Figure 2 Plastic tracheal cannula
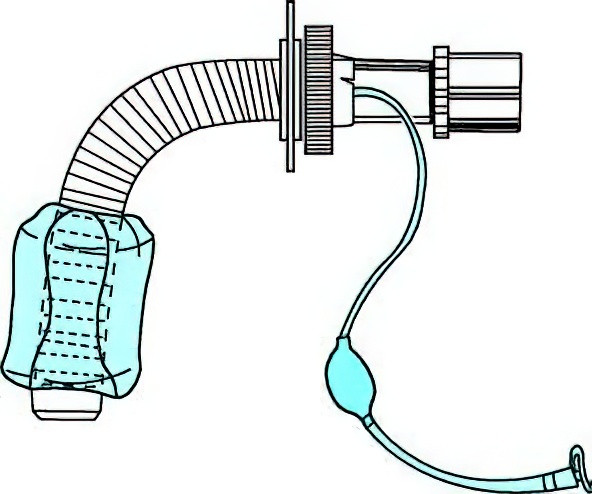
Figure 3 Silicone tracheal cannula with cuff, compatible with an anesthesia machine or oxygen bag
Emergency Equipment
Oxygen, tracheal intubation equipment, anesthetic laryngoscopes, and emergency medications should also be made available in preparation.
Surgical Procedure
Positioning
The patient is generally placed in the supine position with the shoulders elevated and the head extended backward, maintaining a midline position. If shoulder elevation aggravates respiratory distress, it can be deferred until after the skin is incised and the anterior cervical tissues are separated. In cases of severe respiratory distress where the patient cannot lie supine, a semi-recumbent or seated position can be adopted for the procedure.
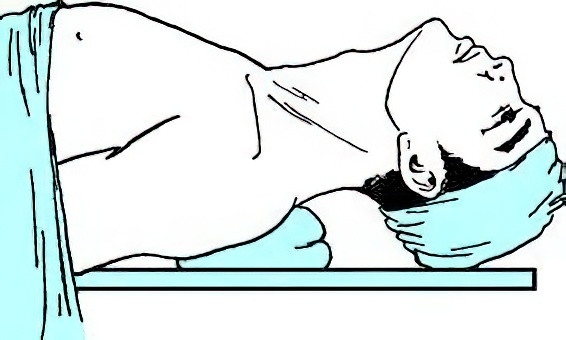
Figure 4 Patient positioning for tracheotomy
Anesthesia
Local anesthesia is typically used, with 1% procaine or lidocaine solution administered for subcutaneous and subfascial infiltration anesthesia in the anterior cervical region.
Steps of the Procedure
Incision
Two types of incisions are used—vertical or transverse.
- Vertical incision: Along the midline of the neck, from the lower edge of the cricoid cartilage to approximately one finger-width above the suprasternal notch. The skin and subcutaneous tissues are incised longitudinally and separated to expose the white midline fascia of the neck.
- Transverse incision: Approximately 3 cm below the cricoid cartilage, a 4–5 cm transverse incision is made along the horizontal skin lines of the neck. Following skin, subcutaneous tissue, and platysma muscle incision, tissues are separated superiorly and inferiorly.
Separation of the Infrahyoid Strap Muscles
Using hemostatic forceps, the white midline fascia is bluntly divided longitudinally. The sternohyoid and sternothyroid muscles are retracted laterally with equal force using retractors, maintaining the midline position. The tracheal rings can be palpated with a finger to avoid tracheal displacement.
Exposure of the Trachea
The thyroid isthmus usually crosses the 2nd to 4th tracheal rings. It should be partially separated along its lower edge and retracted upward to expose the trachea. If the isthmus is broad, it may be cut and sutured.
Tracheal Incision
The anterior wall of the trachea is sufficiently exposed, avoiding excessive separation of the anterior tracheal fascia or lateral displacement of the trachea to prevent postoperative subcutaneous emphysema. A syringe containing fluid is inserted into the trachea, and air bubbles observed upon aspiration confirm the tracheal position. The trachea is incised vertically at the 3rd–4th tracheal rings or a tongue-shaped tracheal flap is created and fixed to the skin. Avoid incising the 1st tracheal ring to prevent cricoid cartilage injury, which could lead to laryngeal stenosis. The incision should not extend below the 5th tracheal ring to avoid major vascular or pleural damage.
Insertion of the Tracheal Cannula
The tracheal incision is widened using hemostatic forceps or a tracheal dilator, and a cannula with an obturator is inserted. The obturator is promptly removed, typically resulting in the expulsion of secretions, which can then be suctioned out using a suction device before placing the inner cannula. If no secretions are expelled, a small amount of cotton can be placed at the cannula opening to observe any movement with breathing. If no movement is observed, the cannula may not be in the trachea and may have created a false passage between the posterior tracheal wall and the anterior esophageal wall. In such cases, the cannula should be removed and reinserted into the trachea under the guidance of a suction catheter or visualization with a fiberoptic laryngoscope.
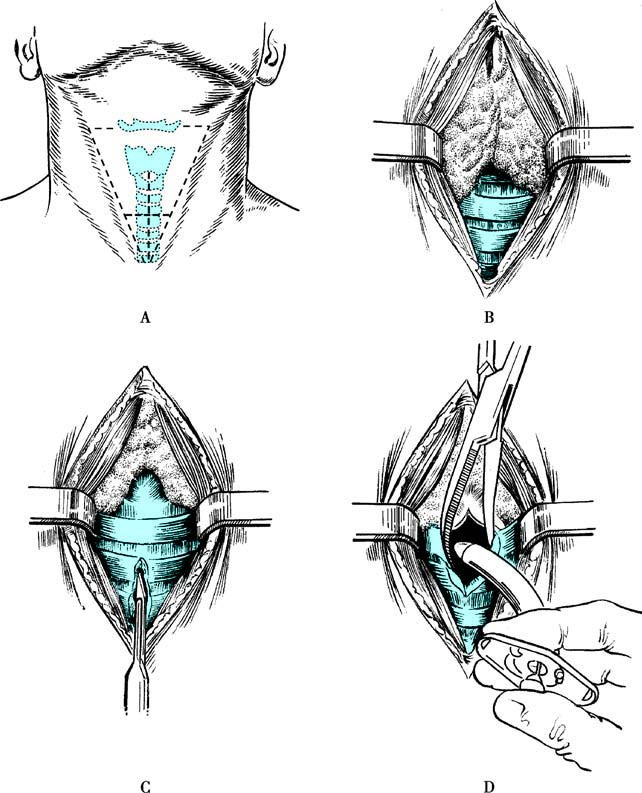
Figure 5 Tracheotomy procedure
A. Incision
B. Exposure of the Trachea
C. Tracheal Incision
D. Insertion of the Tracheal Cannula
Fixation of the Cannula
The cannula is secured by tying straps on both sides around the neck with appropriate tightness, ensuring the cannula does not dislodge.
Closure of the Incision
For a vertical incision, only the portion of the incision above the cannula is sutured, leaving the lower portion of the incision unsutured. For a transverse incision, suturing is performed based on the size of the incision, but the sutures should not be overly tight to avoid the risk of subcutaneous emphysema.
For patients who have already undergone tracheal intubation, percutaneous rapid dilation tracheotomy can also be performed. The positioning and method are consistent with the conventional tracheotomy approach. The key difference lies in the anesthesia procedure, during which a needle is inserted into the trachea, and a guidewire is introduced through the needle. Following the removal of the needle, the guidewire is used to guide the cannula into the trachea, after which the cannula is secured in place. If conditions allow, this process can be assisted under the supervision of a fiberoptic bronchoscope. Percutaneous rapid dilation tracheotomy is a simple and rapid method, but caution should be exercised in patients with a low-positioned larynx or a large thyroid isthmus.
Postoperative Care
Maintaining Patency of the Inner Cannula
Ensuring the patency of the inner cannula is critical in postoperative care. The inner cannula is typically cleaned and disinfected every 4–6 hours. After cleaning and disinfection, it is immediately returned to its position. If secretions are abundant, the cleaning frequency should be increased to prevent dried secretions from adhering to the inner wall of the cannula, which could obstruct breathing. The first replacement of the tracheal cannula is generally performed one week after surgery to avoid difficulties in re-insertion if the tracheostomy tract has not yet formed.
Maintaining Appropriate Indoor Temperature and Humidity
The indoor temperature should be maintained at approximately 22°C, and humidity should exceed 90%. Adequate airway humidification is essential to prevent tracheal dryness, impaired ciliary function, and the formation of crusted secretions that could obstruct the airway.
Ensuring Lower Respiratory Tract Patency
Accumulated secretions within the cannula or trachea should be promptly removed. For thick, viscous secretions, nebulization or steam inhalation can be used.
Maintaining Cleanliness of the Neck Incision
The incision site is disinfected and cleaned daily, and the cannula dressing is replaced regularly.
Preventing Cannula Obstruction or Dislodgement
If the patient experiences respiratory distress after a tracheostomy, the following potential causes should be considered and addressed accordingly:
Obstruction of the Inner Cannula
If the inner cannula is obstructed, removal typically alleviates the respiratory distress. Cleaning and reinserting the cannula will restore its functionality.
Obstruction below the Cannula in the Trachea
If removing the inner cannula does not improve breathing, normal saline can be introduced, followed by suctioning of deep secretions and crusted material, which should alleviate the difficulty in breathing.
Dislodgement of the Cannula
Common causes of dislodgement include loose ties, untied knots, a cannula that is too short, swelling of the neck, a tracheal incision placed too low, subcutaneous emphysema, or excessive coughing and struggling. If dislodgement occurs, the cannula should be reinserted immediately.
Other Cardio-Pulmonary Conditions
These may include pneumothorax, asthma attacks, pulmonary vein thrombosis, or heart failure, which should also be considered. Patients, especially within the first three postoperative days, require frequent monitoring for signs of wound bleeding, subcutaneous emphysema around the neck, and the tightness of the cannula ties to promptly identify and address any complications.
Cannula Removal
Cannula removal may be considered when the primary condition is treated, and normal breathing and swallowing functions return. Before removal, the cannula is occluded for 24–48 hours to evaluate respiratory stability during activity and sleep. If stable breathing is observed, the cannula can be removed. After removal, the wound is disinfected, cleaned, and closed with butterfly adhesive strips. Close monitoring of respiratory status is necessary for 1–2 days following removal.
Postoperative Complications
Subcutaneous Emphysema
This is the most common complication. Contributing factors include excessive separation of the anterior tracheal soft tissues, overly long tracheal incisions, or excessively tight suturing of the skin incision. Violent coughing during tracheal incision or cannula insertion can allow air to enter the cervical soft tissues through the incision, spreading along the muscle, fascia, nerves, and vascular spaces to the subcutaneous layer. Mild subcutaneous emphysema is localized around the cervical incision, while severe cases can extend to the face, thorax, back, and abdomen. Subcutaneous emphysema typically stops progressing within 24 hours and resolves spontaneously in about one week. Severe cases may require removal of the incision sutures to allow air to escape.
Mediastinal Emphysema
This is often caused by excessive separation of the anterior tracheal fascia, which allows air to travel downward into the mediastinum. Mild cases may be asymptomatic and are detected only on X-ray. Severe cases present with symptoms such as shortness of breath, diminished heart sounds on auscultation, and indistinct cardiac dullness on percussion. X-ray findings may reveal a widened mediastinal opacity, and lateral views may show linear air opacities between the heart and chest wall. Timely decompression is achieved by separating the tissues anterior to the trachea at the suprasternal region to release the trapped air.
Pneumothorax
Pneumothorax occurs more often in children because of the relatively higher position of the left pleural dome. Excessive downward separation during tracheal exposure could damage the pleural dome and cause pneumothorax. Severe laryngeal obstruction leading to high intrathoracic negative pressure, coupled with violent coughing, may also cause alveolar rupture, resulting in spontaneous pneumothorax.
Bleeding
Bleeding can be classified as primary or secondary. Primary bleeding, which is more common, often results from injury to anterior cervical veins, the thyroid gland, or its vascular supply, or from incomplete hemostasis or slippage of vascular ligature knots during surgery. Postoperative minor bleeding can often be managed by packing the area around the cannula with iodoform gauze for compression, though care must be taken to prevent the gauze from entering the airway. Large amounts of bleeding require immediate reopening of the wound and ligation of the bleeding vessels. Secondary bleeding is less common and usually occurs when a low tracheal incision and excessive forward curvature of the lower end of the cannula damage the tracheal wall, potentially injuring the innominate artery or vein and causing massive bleeding. In such cases, cannulas with inflatable cuffs or anesthesia endotracheal tubes can be used to secure the airway while initiating emergency measures.
Difficulty in Cannula Removal
Reasons for difficulty in removing the cannula include a high tracheostomy site, injury to the cricoid cartilage, granulation tissue formation in the tracheal lumen, and unresolved primary disease. Diagnostics such as laryngoscopy, tracheoscopy, or CT imaging of the larynx and trachea may identify the cause, which can then be treated accordingly.
With advancements in modern techniques, new methods for tracheostomy, such as percutaneous dilational tracheostomy, have emerged. This procedure involves the use of dilators to enlarge the skin, subcutaneous tissue, and anterior tracheal wall under guidewire assistance, allowing insertion of the tracheal cannula. This method is advantageous due to its simplicity, short operative time, minimal trauma, reduced bleeding, rapid postoperative wound healing, and minimal scarring. However, complications such as bleeding and difficulty in cannula removal due to cricoid cartilage injury may occur during blind procedures.